
How to Change Authorised Signatory Online At GST Portal?
- December 31, 2019
- Posted by: Editorial Team
- Category:
There are several problems happens whenever the taxpayer required to files GST or GST related to any work. Many taxpayers want to know how to change authorised signatory in GST. So keep reading this articles to know how to change authorised signatory in GST.
If you want to change the authorized signatory, You must have an old mobile number, old email id as well as a new mobile number and new email id.
Steps to Change the Authorised Signatory in GST
Step 1: Go to India GST portal by following this link https://www.gst.gov.in/ and log in by filling the user name and password.
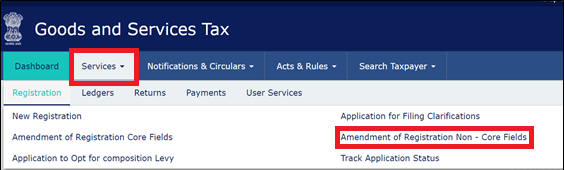
Step 2: In this steps, you have to click on the Service>Registration option and then select the amendment of registration non-core fields.
Step 3: The tabs for editing will be shown on the screen. You have click on the authorized signatory tab.

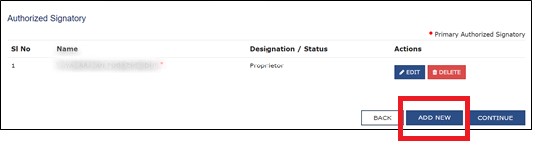
Step 4: The current authority signatory will be shown on the screen. You have to click on the ‘Add New’ option.
Step 5: Afterward add authorized signatory whose email and mobile number you want to use and fill the complete page like new registration. Click on the ‘SAVE’ button.


Step 6: Click on the ‘verification’ option
- Tick on the checkbox of the verification

- Select the authorized signatory from the name of authorized signatory (Dropdown list)
- Fill the place name
- Choose the suitable option to digitally sign the application using Digital Signature Certificate (DSC) or EVC or E-Signature.

Step 7: Afterward, a message will be shown on the screen of the successful submission of the application for correction in GST registration. Automatically An acknowledgment will come on the old e-mail address and mobile number within 15 minutes.
Step 8: After 15 minutes of submission of the application for amendment or Once the acknowledgment is received, you will have to log in to the GST portal again.
Step 9: Select the Authorised Signatory tab again.
Step 10: Deselect the Primary authorized signatory checkbox for the old signatory and select the newly added signatory as the Primary authorized signatory.
Step 11: Verify your mobile number and email ID that you filled (above steps) for the newly added signatory.
Step 12: At last, you will have to go to the verification tab and submit the application by using DSC/E-Signature/EVC.
Step 13: After the submission of the application within 15 minutes, you will get an acknowledgment automatically on both, the new email address as well as the mobile number.
Hence the Change Authorized Signatory in GST Portal is very easy without going to any government office or Without the support of any Assessing Officer.